Stand Tall: A how-to on tall valve covers
Author: Dr. Rudy Rouwehya
Title: Feature Editor
 As we make our Mustangs go faster we make changes to the valvetrain that at some point necessitate taller than stock valve covers to fit. Some like the "racy" look of taller valve covers but to the hard core enthusiast they serve a bigger purpose. The most common reason to use tall valve covers is to be able to fit aftermarket roller rockers and valvetrain stabilizers more commonly known as stud girdles. However, before you decide to simply bolt on a set of those polished, tall, Motorsport valve covers you should be aware of the challenges late model EFI engines present.
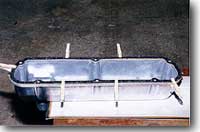
 First, the Motorsport tall valve covers require some prep work before they can be used. This prep work consists of removing a little casting flash from inside the valve cover using a die grinder or Dremel tool with some sandpaper roll wrap. The as delivered condition of these covers shows quite a bit of casting flash concentrated along the baffle plate area as well as the ridges present. Knocking these off now may help prevent them from coming off later when your motor is running! You don't need this to break off and drop into your motor. Next, the valve covers are marked internally for, but not cut, for a breather/oil filler hole. You will need to determine where you want to place your breather/filler hole and open it up with a hole saw. For and EFI Mustang, the factory marked location
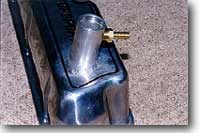 works well and corresponds to the area under the baffle. Incidentally, the baffle is not installed in out of the box condition and must be attached as well. More on that later. Before opening up the hole for a breather on the passenger side front of the valve cover, you have to decide two things. First, do you wish to stay emissions legal? If so, you will need to duplicate the factory closed PCV system by adding a filler tube incorporating a barbed fitting for the line to attach to. This duplicates your OEM setup. I had difficulty finding the appropriate size tubing for with a filler cap that would snap into it. The reason being that the valve covers are aluminum and
 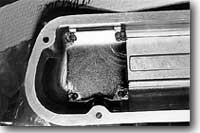 require an aluminum filler tube to be TIG welded in place. If emissions legality is not a concern (on a racecar) you can simply cut the hole open for a push in style breather. But first you need to decide whether you want 1 3/8" or 1 1/2" hole. Open as well as baffled breathers are plentiful in the aftermarket in both sizes. In addition, if you run a racecar and want to open up both valve covers so as to take advantage of header evacuation systems, now would be the time to do so. In some cases the valve covers may interfere with the backside of certain roller rockers (the side closest to the intake manifold, or pushrod side). If this happens you may need to slot the valve cover mounting holes slightly in order to allow you to shift them over somewhat.
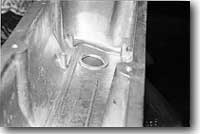
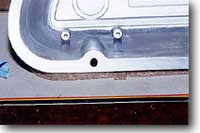
 This leaves one more item to attend to before they can be physically bolted to your heads. There are four drilled but untapped cast in mounting bosses for placing a baffle plate in place. Run the four supplied screws through these bosses to thread them but do not bottom them out. The screws are prone to snapping off. Once you have modified
 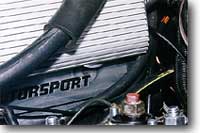 the valve cover and removed the casting flash be sure to thoroughly wash it out and blow it dry with compressed air. Next, place the baffle plate in the valve cover and attach it with the previously mentioned screws using red loctite on the threads. For added safety against the screws coming loose in your running motor, place a dab of silicone sealer on each screw head and fold it over the edge of the baffle. After allowing this to dry, the baffle and screws should stay securely in place.
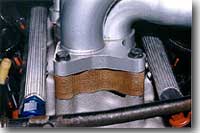
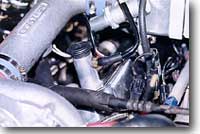
 Now that the valve covers themselves have been properly prepped, we can address some other clearance issues. Due to the added height of the Motorsport valve covers they interfere with the underside of the EFI upper intake. This is not generally a problem with box style, short runner intakes however, most cars use a long runner intake such as the popular GT40 and Cobra styles which require some changes. A spacer between the upper and lower intakes will
 provide the required clearance and a 1" phenolic type works well. Of course this in turn will require a taller aftermarket hood to clear the intake. Besides the valve covers being taller, some aftermarket heads also feature raised cover rails. An example of this is the TFS Street Heat this is why a 1" phenolic spacer is your safest bet as shorter ones may not be enough. The underside of the GT40 upper intake will still not have sufficient clearance on the driver's side for the fitting that connects the PCV hose. This hole will need to be blocked with a threaded plug and the hoses rerouted to another source such as a port on the front side of the intake. The factory "T" shaped fitting will dent the valve cover if this is left in place.
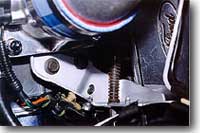
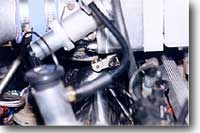
 We are not done with the clearance issues yet. Even with the upper intake spaced 1"higher, there is not enough room for the factory throttle cable bracket to be bolted in place. Due to contact with the tall valve cover the bracket will need to be repositioned about 5/8" higher. This necessitates either slotting the two mounting holes in the
 bracket, or welding them shut and re-drilling them lower to raise the bracket. The backside of the bracket will also need to be ground for some additional clearance to the EGR plate and throttle body. This is because the bracket is somewhat stepped in configuration rather than flat. After these modifications the bracket will barely rest on the topside of the valve cover. An alternative method would be to fabricate your own throttle cable bracket and do away
 completely with the stock one. You will also notice at this point that there isn't enough room to snap the factory throttle cable onto the throttle body lever. This is remedied by removing the throttle body from the vehicle and heating the arm then bending it approximately 45 degrees. One final item that may need to be altered is for those running superchargers where the bypass valve hoses may need to be lengthened due to the increased height of the intake. It makes it such that the hoses are at an awkward angle and by using a longer hose the proper orientation is restored. Now the tall valve covers should fit well and clear everything.
[AutoNews Index]
[Views: 46829]